Showing posts with label decor. Show all posts

Wednesday, February 12, 2014

DIY Heart Shaped Photo Collage

I was skimming through some old pictures on my shutterfly the other day and came across this project. I was so surprised that I took a picture step by step, as if I knew I would one day have a blog to post it on!
 
At the time my husband and I were newlyweds and had just moved into our apartment. I was so excited to finally decorate my own house and make it our own. Like any other girl, I went to Pinterest for inspiration and found several wall art collages. I knew I wanted to incorporate our wedding pictures I just printed from shutteryfly do I decided on a heart. (You get 50 free prints when you sign up)
 
Heart shaped photo collage
 
Supplies:
(52) 4 x 6 photos (8 vertical & 44 horizontal)
(52) 4  x6 Cardboard frames ( I found a 3 pack at Dollar Tree)
Black acrylic paint (if frames aren't black already)
Foam brush
Scotch tape
(2) 5 ft of string ( I used yarn)
4 Push pins
Pencil
Spray adhesive
Construction level (optional, I didn't use one)
Measuring tape (optional)
  
Directions:
  • After you've picked out your pictures, paint your frames black and set aside to dry
  • Once they have dried, place a picture on the back side of the frame and tape. Repeat this process with all your pictures.


  • Next lay out your photos on a flat surface, the floor worked best for me, and begin to arrange your photos. I started from the bottom then worked my way to the top, either way works.


  • After you have it all laid out the way you like it, measure the length of the collage with either the measuring tape or yarn.
  • Take your measurement to the wall where you want the collage to be. Hold it in the middle of the wall vertically with your push pins and mark the top, bottom and middle. Repeat the same process horizontally. The place where the two strings meet is the middle, this is where your will start your fifth row.
  • Follow directions on spray adhesive bottle. Spray the back of the first picture frame starting on the left side of the fifth row and center picture underneath string. The string should be right in the middle of the picture frame.
  • You can move down your horizontal string to help you keep a straight line. You can move the string up and down and you move along. ( After the fifth row I continued downward then moved up, either way will work) 


Hope this post helped.
Thanks for stopping by:)



post signature

Monday, January 27, 2014

DIY Kitchen Chalk Board


I have always wanted a chalkboard for my kitchen to help with meal planning. It is also a great way to add wall art with out being too cheesy with "kitchen decor." As you may have guessed I am a Hobby Lobby junkie! I am ALWAYS there walking the aisles looking for inspiration and deals. I have found many kitchen chalk boards designed specifically for the kitchen but all have thing in common, they are all high priced. Now I am a bargain shopper, I try my best not to spend over $20 on decor. Why? Because I know that I can make it myself for much less.

This DIY project is quick and easy and only cost $6! A tip on shopping at Hobby Lobby is using their 40% off coupon on items that aren't already 50% off. I always check their news letter to see what items are on sale that week to make sure that I buy all my item either at 50% or 40% off.


Materials:

  • 17"x 23" chalk board
  • 60 piece pack of wood letters
  • Acrylic paint
  • Paint brush
  • Painters tape
  • Glue gun
  • Glue sticks

Directions: 

First choose what phrase you would like on your chalk board and separate the necessary letters to spell it out. 
Next paint each individual letter making sure that every crevice is covered. Set them aside to dry.


Next line the black board with painter tape as close to the frame as possible and paint the wooden frame then set aside to dry.
While the paint is drying put glue stick in gun and plug in to start warming up
Once the paint is dry and glue is hot, begin to glue wooded letter on the edge of the chalk board.
You can place them either on the top or bottom or both like I did.


Now you can write your meals for the day or week. I think we all hate the feeling of not knowing what to make for dinner so this can  help you feel organized and have a plan for your meals.


Hope this post helped.
Thanks for stopping by:)


post signature

Monday, January 13, 2014

DIY: $4.00 Mustache Framed Art

The mustache trend is very big right now. It's used in many different ways like party themes, apparel,and even decor. On one of my many trips to Hobby Lobby, I came across some really cool mustache framed art. I thought that it would look great in my bathroom wall and help make it more masculine for my husband but didn't want to pay $30 for something I can make myself. So here is a DIY project for only $4.00! 


Materials:
 2 Frames ( I used 11x14 frames from dollar tree)
 1 Black poster board
 2 sheets of white card stock paper
 1 (11) pack of mustache stickers ( I bought mine at hobby lobby and used a 40% off coupon)

Directions:

First cut out each mustache sticker so that way you can layout how you want them placed.


Next, using the back cardboard from the frame, trace out two rectangles on the poster. They should measure 11x14 inches.


Now cut a two inch piece of tape and fold in the two ends to create double sided tape.
Place in the middle of the white card stock paper.
Next turn paper around and tape it in the middle of the black poster board and place inside the frame.


Now the fun begins! Arrange your stickers on top of the glass in the order you would like. I did five on each frame. Position the other five stickers next to the frame you are working on to see how they look together.


Once you have the stickers arranged how you like them, gently take off the sticker and stick on the glass starting with the bottom sticker first. Don't place firmly until you are happy with the placement. If you'd like, you can use a ruler to measure out the space between the edge of the white paper and the stickers. I chose not to.


I started with the bottom sticker then placed the top one. This helped me arrange the reaming three evenly.   Again, make sure you are very careful when taking off the stickers. There are parts on the mustache that are thin and can be easily torn.


Repeat the same process with the other frame.


Total cost:
Frames: $2.00
Stickers: $1.49
Poster: $0 (already had)
Card stock: $0 (already had)

Total = $3.49 (with poster should be around $4.00)


Hope this post helped
Thanks for stopping by:)


post signature

Thursday, January 2, 2014

Have a boring sofa?

I love adding color and print to any space especially the living room. Today I decided to share some different ways to dress up your sofa. Some of you might have your matching pillows you bought with your sofa or if you're like me a hand me down. Either way both sofas are in desperate need of a face lift. When I got married I had some sofas sold to us for $50 and jumped at the opportunity. They weren't my first or even my last choice lol but they would do for the time being.

   Look at this sad, boring, plain brown fabric.

So I turned to the place where I get all my inspiration...HGTV. I started filling my head with ideas and began putting them together. I decided to go with light blue, yellow and green for my living room colors and try to brighten up my sad sofas. Now to find some pillows and throw blankets! On one of my many trips to Ross I came across some awesome pillows on clearance and knew right away that I needed them. I was a bit hesitant to buy them at first because the total cost of the pillows and blankets were going to cost more then the sofas!!! I thought,  "I can make these for less!" But there was one problem, I didn't have a sewing machine at the time so I decided to just make the investment and purchase them. Haha "Investment," my husbands favorite word.

 I had already bought an awesome chevron pattern rug at Rugs USA and new that I didn't want to repeat that pattern. You see when picking out accent pillows and throws try to find different patterns and colors that all go together and aren't too "matchy matchy." Just have fun with it. All the blue colors I bought aren't the same but they all match. Texture is very trendy and modern right now so the faux fur and round pillows I found were perfect. If you already have pillows a less expensive way is to make pillow covers, that way you can choose what fabric you want. Here are a couple of tutorials: 5 Minute Pillow Cover & The easiest pillow cover ever (if you don't have a sewing machine or don't know how to sew.)


Here are some of my inspirations pictures I found on HGTV.
HGTV
HGTV

HGTV
HGTV

Don't be afraid to completely copy someone's design if you feel like you wouldn't be able to pull off your own. Here are some links for pillows that you can buy for your sofa. 


Target
Walmart
 

BulandsBathBoutique
ThatsMyPillow
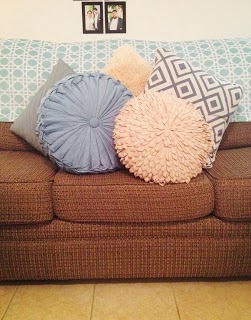
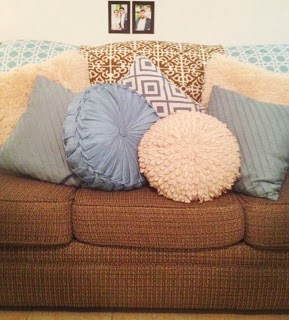
And now for my sofa:) I arranged the pillows several ways for different options and also to accommodate for how many pillows you may have. I try to change it up every once in a while to have a new look. 


Hope this post helped, if you have any ideas or questions post in the comments below. 
Thanks for stopping by:)


post signature